


One day, a young chef in a restaurant was attempting to create a new dish. He was struggling with how to perfectly combine corn and duck egg. As he pondered over it, he noticed a duck wandering in the courtyard. The presence of the duck sparked his inspiration. He decided to experiment with baking corn kernels with salted duck eggs to achieve a unique flavor and texture.Carefully selecting fresh corn kernels and high-quality salted duck eggs, he ingeniously paired them together. While baking in the oven, the corn kernels gradually absorbed the aroma of the salted egg yolk, and the duck egg became soft and flavorful. This dish became the signature dish of the restaurant, attracting countless diners who wanted to taste it.Whenever someone asked about the origin of this dish, the chef would smile and say, “It came from a duck wandering in the courtyard. I just captured that inspiration and crafted it with love.”
Ingredients for Baked Corn with Egg Yolk:
| Canned corn | 600g |
| Salted Egg Yolk | 200g |
| Custard powder | 10g |
| Starch | 50g |
| Sugar | 8g |
Step:
1.To prepare the ingredients for Baked Corn with Egg Yolk, we first went to the supermarket and bought two cans of corn kernels and a bag of salted egg yolks. Back at home, we immediately took out the salted egg yolks and steamed them in a pot for ten minutes to ensure they were fully cooked. Once the salted egg yolks were steamed, we removed them from the pot and chopped them into a powdery texture. For the best texture and eating experience, it is important to chop the salted egg yolks as finely as possible. Though this process may be a bit laborious, it is worth it for the enjoyment of delicious food.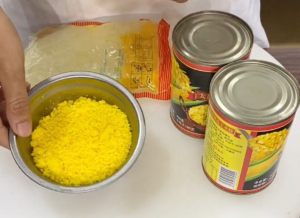 2.Next, we opened the cans of corn kernels and drained the liquid from the corn into a bowl. We added some custard powder to the bowl, which adds a milky flavor to the dish, and stirred it well. Then, we added starch to the bowl, but it is important to note that we should add it gradually and in small amounts, stirring continuously. This ensures that each corn kernel is evenly coated with starch without becoming too thick. We kept stirring until the corn kernels in the bowl were distinct and appeared tempting, like in the picture. At this point, we were fully prepared for the next cooking step.
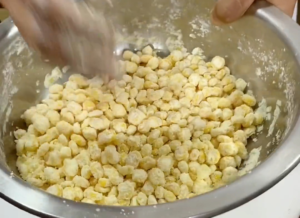 3.We heated the oil in a pan and when the oil reached medium heat, we carefully poured the corn kernels into the hot oil. The corn kernels created ripples in the oil, becoming plump and golden as the heat penetrated them. After placing the corn kernels in the pan, we didn’t immediately stir them. Instead, we let them fry in the hot oil for about 30 seconds until the surface turned slightly yellow and began to solidify. We then gently flipped the corn kernels with a slotted spoon to separate them and make them distinct. After flipping a few times, we could see the corn kernels jumping and rolling in the pan. At this point, we needed to be patient and continue frying with medium heat for about a minute, ensuring that the starch on the surface of the corn kernels was thoroughly cooked. It is important to note that since the corn itself is already cooked, we shouldn’t over-fry them. Over-frying can make the corn kernels too dark and affect the taste and appearance. Once the corn kernels turned golden and were fully cooked, we quickly poured them out of the pan and used the slotted spoon to drain off excess oil.
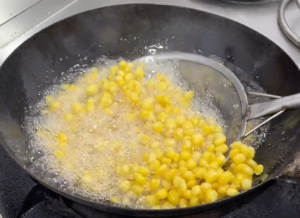 4.Heat the pan again, add a little oil, and turn on low heat to prepare frying the egg yolk. As the temperature rises, the egg yolk slowly melts in the pan, releasing an enticing aroma. Continue frying over low heat, allowing the egg yolk to gradually expand and produce small bubbles. This process requires patience and the ability to control the heat, as too high heat can cause the egg yolk to burn, while too low heat may not fully cook the egg yolk. When the egg yolk is fried until it becomes foamy and slightly yellowish, we know that it has reached the ideal frying state. At this point, prepare the next ingredients for the final mixing and cooking.
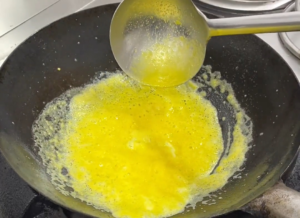
5.Quickly pour the fried corn kernels into the pan and stir-fry them rapidly to mix well. During the stir-frying process, you can feel the perfect combination of the egg yolk and corn kernels, as they wrap around each other, creating a delicious dish. Then, add an appropriate amount of white sugar according to personal taste preferences. If you prefer a sweeter taste, you can add more sugar to enhance the texture and flavor. Continue stir-frying until the white sugar completely melts and blends thoroughly with the egg yolk and corn kernels. 6.After continuous stir-frying and thorough mixing, the Baked Corn with Egg Yolk takes on a tempting golden color and emits a rich aroma. At this point, you can directly remove it from the pan and plate it, presenting this delicious dish in front of you. A serving of sweet and tasty Baked Corn with Egg Yolk is now complete! You can indulge in the culinary delight it brings, experiencing the perfect fusion of fresh and sweet corn with the rich aroma of the egg yolk, creating a unique texture and satisfaction.
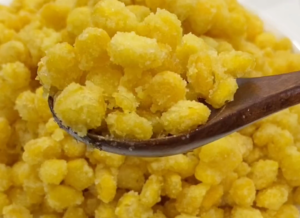 Tips:
Tips:
1.When handling salted egg yolks, you can choose to steam or bake them according to personal taste preferences, to achieve different texture effects.
2.Canned corn kernels should be drained well before use to ensure the desired texture and frying results.
3.When mixing the corn kernels with the egg yolk, it is important to stir-fry and mix quickly to evenly coat the corn kernels with the egg yolk.
Imagine golden corn kernels dancing on your tongue, each one enveloped in a rich egg yolk sauce, like precious gems kissed by the sun. As you gently bite into them, the sweet sauce bursts in your mouth, blending with the freshness of the corn, creating a symphony of flavors. And that creamy texture, like autumn clouds, soft and comforting, irresistible. This is the charm of Baked Corn with Egg Yolk, it leaves a lasting impression, as if you’re not just tasting food, but also experiencing the stories of autumn and the warmth of home.